Friday, 2 September 2011

Exploration of Pahang State - Cameron Accommodation


Staying in town is not a good idea of ahighland holiday when nature surrounds you. You should pamper yourself with history, spacious rooms overlooking picturesque gardens and crackling log fires warming up the cool highland night. You'll get all of these at the The Bala's Holiday Chalet

 
This quaint colonial style hotel, situated upon a seven-acre plateau, is within proximity to train station. Guests will also enjoy a location the is only four-kilometers from the airport, and close to a myriad of amazing scenic, cultural, and tourist attractions. The hotel boasts a comprehensive selection of hotel rooms, perfectly suited to fit within the constrains of any budget. The Strawberry Park Resort is ideal for guests who want comfortable furnishings, interesting surroundings, and a unique selection of on-site facilities.


The Cool Point Hotel
891, Pesiaran Dayang Endah, 39000 Tanah Rata, Cameron Highlands, Pahang.
Ideally tucked away in a quiet serene corner of Tanah Rata rown and adjacent to the Garden. The Cool Point Hotel offers well-appointed rooms and facilities to suit both business and leisure travelers.


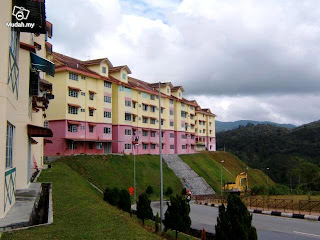
All apartments are equipped with quality fittings & furnishings, suitable for family & friends gathering. 3 bed room, for 8 pax, Fully furnished, Kitchen with utensil. Located 2 minutes from Tanah Rata and 5 minutes from Brinchang.

Arabella Holiday Home was specially built to be a perfect hideaway for those on a holiday or on business. It help make your stay an extraordinary experience. These buildings have been designed to match the calming, green surrounding. Even the gardens are planted with bougainvillaeas whose crimson flowers welcome you warmly at any time of the year.


Enjoy a great Highlands holiday at Valleyview bungalow. Get away from the hustle and bustle of the city and enjoy the peace and quiet in your own home away from home. Wake up to the sounds of nature and magnificent views of the mist-covered valley and rolling hills.


Thursday, 1 September 2011

Exploration of Pahang State - Tioman & Taman Negara Accommodation


You can walk along the paveways to our chalets and enjoy the beautiful scenery of the white sandy beaches and the refreshing green landscape. All chalets are timber made and are designed to merge with the surroundings, a distinction expression of Malay traditional architecture. A perspective view of Genting Bayu Chalets... You can clearly see how peaceful and beautiful our place is.The tall slender coconut trees enhance the mood of being on an island, especially when you are staying on one of the ten most beautiful islands in the world!


Welcome to Bagus Place Retreat!
Located on beautiful Tioman Island in the South China Sea, Bagus Place Retreat is a peaceful sanctuary of breathtaking natural beauty. Bagus Place sits on a secluded beach with crystal clear water, surrounded by tropical forest, at the foot of two mountains where eagles nest.


There are few types of accommodations to suit your varied needs:
Standard Guesthouse Terrace Guesthouse, 2 single beds or 1 double bed unit with jungle view & hot/cold shower.

Chalet Single Storey Chalet, 2 single beds or 1 double bed with jungle view & hot/cold shower.

Bungalow Double Storey with 2 bedrooms, sitting parlour & balcony overlooking Tembeling River, satellite TV, dining room, Kitchenette, tea/coffee making facilities, mini bar & hot/cold shower.

Hostel/Dormitory Double-deck bunkers with mosquito screens, ceiling fan and Air conditioned, locker and common bath. Towels & locker key are provided subject to deposit. 8 persons per dorm. Suitable for guests traveling as a group.


Sunday, 21 August 2011

Tan Poh Yee - Accommodation

Description on the individual ideation of the link
The thought of the site is designed to introduce the places of Pahang state. The four places that we have chosen for Pahang are Genting Highlands, Cameron Highlands, Taman Negara, and Pulau Tioman. The ideations of the links are transportation, accommodation, activities and so on. Accommodation link is to help the viewers to grasp about the staying places of few tourism spots in Pahang. Links are easily associated and located in order to make the information flows straight forward to the viewers.

Objective of the link
The objective of this link is to let viewers know about where to stay and what type of services available for tourists in these tourism places. Besides that, it also shows how the accommodation provided attracts the tourists to visit which acts as one of the methods to promote Pahang state.

Design of GUI: 


A banner is being designed to promote Pahang state using Photoshop. The banner will be located at the top of the site and there are links such as home, destination, accommodation, transportation and also activities in order to provide viewers more information on tourism places in Pahang. As mentioned, there are 4 famous spots that we would like to emphasize on in Pahang which will be located at the side bar. Links are all easily connected and accessed to get details of each places and also it can return to home page or associated to other buttons. Below is the sample of how the page will be exactly like after a click on the link.                     


Wednesday, 27 July 2011

Tutorial 5 - Advanced Layering

To complete the lesson taught by Madam Lydia, we learn to apply advanced layering skills.
Here I chose to present the clipping mask skill.

Firstly, open the image I've done on Tutorial 3 & 4.
The part that I would like to make changes on is the 'Faculty of Management' font.


Secondly, I find a purple book to clip with the font.
In order to clear the white background, use magic wand to delete the unwanted area. 


Thirdly, enlarge the book and fit into the font.
On the purple book layer, choose 'create clipping mask'.


After clipping, here's the result.


To make the font looks more differently, click on the blending option, pick the style you like.


Friday, 15 July 2011

Tutorial 3 & 4 - Retouching and Enhancing

It's kinda busy for these few weeks.
However, I will also update what I have learn from Madam Lydia's lesson.
We focus on the usage of retouching and enhancing tools for this week


Now, let's open the psd file of previous work then continue from there.

The first changes that I would like to make is on the "student 1". 
By clicking the thumbnail of "student1", you will get the below dialog box. Explore yourself by checking different blending options.

Press Filter and move the cursor to Brush Strokes, pick the Dark Strokes to get below result.

Repeat the above step but different blending options for "student 2" and "student 3".

Go to "Filter", choose "Patchwork" under "Texture".


Apply Rough Pastels:

Go to Filter > Render > Lens Flare.


Result:

Again, save the file in jpg and psd format.
Stay tuned for the next lesson.


Sunday, 3 July 2011

Tutorial 2 - Layering Tool

After the first tutorial on selection tool, Madam Lydia taught us on layering in her second tutorial session.

First of all, open a new file by changing the setting to A4 size and International page.

Suppose it is a blank file. However, I change the background color to blue in order to look more colorful.
You can see from the previous image, I have selected the "Gradient Tool" to make below result.

Then, I open the image that I have saved in Tutorial 1. Drag the MMU logo to the page I have created.

To share what I have learn last week, here shows you how to use layering tool.
Click on the "Layer Style" which located under "Layer", and press "Blending Options".
You can explore yourself by clicking different blend mode.
Drag the MMU Grand Hall and Ebee images.
As you can see here, there are 2 Ebees which I drag the Ebee twice and the second Ebee is being blended using the mode of soft light to make it looks like a shadow.

The 3 little students are also being dragged as well as the open day image.


After that, I use the "Horizontal Type Tool" to type text. To make the text colour looks more stronger, I apply blending mode of "color burn".


In order to complete the e-wallpaper for layering basics, I drag the last raw image which is the hat.

I AM DONE!

Not to forget to save it onto 2 files which are the psd file and the jpg file.

Have a nice day and that's it for tutorial 2 =)